
Introduction
In this tutorial we will explore how to implement a Quantum Support Vector Machine (QSVM) machine learning method on IBM’s Quantum computers using qiskit.
What is a Support Vector Machine?
A support vector machine is a supervised machine learning method that is trained using a dataset and will predict if a particular observation is in a certain class based upon what it has been trained on. It is similar to a linear classifier in that it uses a hyperplane to separate classes.
However along with the hyperplane support vectors are used. These are essentially data points that are used to maximise the margin and thus the distance between the classes.
However the Quantum Support Vector Machine is different in that it uses a feature map to map data points to a quantum circuit.
Implementation
First we will need to specify the backend device that we will send the job too.
IBMQ.enable_account('ENTER API KEY HERE')
provider = IBMQ.get_provider(hub='ibm-q')

backend = provider.get_backend('ibmq_qasm_simulator')
Note: For this tutorial you will need an API token which you can get by registering here: https://quantum-computing.ibm.com/
Here we are specify the ibmq_qasm_simulator which is just a classical simulator however you can find which quantum devices are running using:
backend_overview()To implement the QSVM we first need to have a training dataset. In this tutorial we are using a gene expression dataset from the RNA-Seq Nexus from Smokers and Non-smokers and use the gene expression of CDKN2A as the feature.
With this we can predict if the observation is from a non-smoker or a smoker based upon the gene expression of CDKN2A.
The easiest way to implement the dataset in through numpy arrays:
training_data = {'A': np.asarray([[0.324],[0.565]]),'B': np.asarray([[1.324],[1.565]])}Where A is the numpy array for smokers and B is the array for Non-smokers.
Next we implement a testing dataset. This will be used to test the accuracy of the QSVM model. It looks exactly the same as the training dataset.
testing_data = {'A': np.asarray([[0.024],[0.456]}), 'B': np.asarray([[1.777],[1.341]])Next we specify the number of qubits to be used. Rule of thumb is N qubits for N features. Since we are using 1 feature we are using 1 qubit.
num_qubits = 1Then we specify the feature map. This maps the data with second order expansion by entangling qubits. Since we are only using 1 feature and thus 1 qubit entanglement is not required. However for more features it will be.
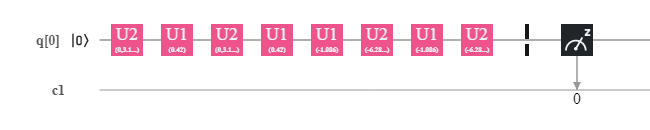 Generated quantum circuit for the QSVM.
Thus in the generated quantum circuit you will see that it consists of only 1 qubit and some unitary gates.
feature_map = SecondOrderExpansion(feature_dimension=num_qubits,depth=2,entanglement='full')In the code above the depth just means the number of times the circuit will repeat. This is normally defaulted to 2. entanglement = ‘full’ means all qubits will be entangled with each other.
Next we create the QSVM with the following code:
svm = QSVM(training_data,testing_data)Then we specify the quantum instance:
quantum_instance = QuantumInstance(backend,shots=shots,skip_qobj_validation=False)This is just a way to specify the backend as well as the number of shots we want the device to run. skip_qobj_validation=False is used to stop any warnings displaying in the output.
Next we run the QSVM to get the accuracy using the following code. This is where it is sent as a job to the quantum device.
result = svm.run(quantum_instance)If we print the result then we will get the accuracy based upon its performance from the testing dataset.
However if you want to use the model to predict unlabelled data then you can use the predict function as below:
data = np.array([[1.453],[1.023],[0.135],[0.266]]) #Unlabelled data prediction = svm.predict(data,quantum_instance) Code
import numpy as np
from qiskit import BasicAer
from qiskit.aqua import QuantumInstance, aqua_globals
from qiskit.aqua.components.feature_maps import SecondOrderExpansion
from qiskit.aqua.components.multiclass_extensions import (ErrorCorrectingCode,AllPairs,OneAgainstRest)
from qiskit.aqua.algorithms import QSVM
from qiskit.aqua.utils import get_feature_dimension
from qiskit import IBMQ

print('Quantum SVM')
print('-----------\n')

shots = 8192 # Number of times the job will be run on the quantum device

training_data = {'A': np.asarray([[0.324],[0.565],[0.231],[0.756],[0.324],[0.534],[0.132],[0.344]]),'B': np.asarray([[1.324],[1.565],[1.231],[1.756],[1.324],[1.534],[1.132],[1.344]])}
testing_data = {'A': np.asarray([[0.024],[0.456],[0.065],[0.044],[0.324]]),'B': np.asarray([[1.777],[1.341],[1.514],[1.204],[1.135]])}

IBMQ.enable_account('ENTER API KEY HERE')
provider = IBMQ.get_provider(hub='ibm-q')

backend = provider.get_backend('ibmq_qasm_simulator') # Specifying Quantum device

num_qubits = 1

feature_map = SecondOrderExpansion(feature_dimension=num_qubits,depth=2,entanglement='full')

svm = QSVM(feature_map, training_data,testing_data) # Creation of QSVM

quantum_instance = QuantumInstance(backend,shots=shots,skip_qobj_validation=False)

print('Running....\n')

result = svm.run(quantum_instance) # Running the QSVM and getting the accuracy results.

data = np.array([[1.453],[1.023],[0.135],[0.266]]) #Unlabelled data

prediction = svm.predict(data,quantum_instance) # Predict using unlabelled data

print('Prediction of Smoker or Non-Smoker based upon gene expression of CDKN2A\n')
print('Accuracy: ' , result['testing_accuracy'],'\n')
print('Prediction from input data where 0 = Non-Smoker and 1 = Smoker\n')
print(prediction)
Output
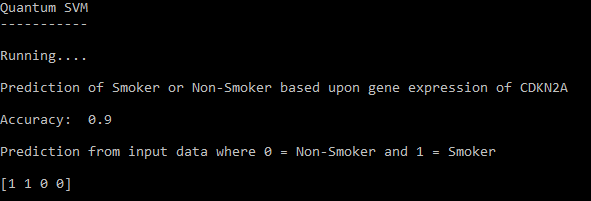 Output of the trained QSVM.